I can't believe I'm saying this, but it's done. No more Pedro. The games up. Hand over the DVD. I feel a little bit sad actually. You wait all term for the finish line, and can't wait to see the final product and have a long deserved month off, but when it comes - ohhh man, what now?!
I can honestly say, hand on heart, this has been the funniest 9 weeks ever. I have cried with laughter almost everyday! I have absolutely loved working on this project, but the laughs and jokes that came with it made it. Most memories have been caught on cam for the extras on the DVD, but to name a few that didn't - wheeling Alec down the corridor, the rock photoshop file I messed up, the hare and the tortoise, crack a bottle, Tex's urghhhs, Argghhh tom, and soooo many more!
TOM
It was my first time working with you Tom, and what can I say..... "TOMMMMMMM, WHAT HAVE YOU DONEEEEEE!" Well you done alot! You were at times difficult, very defensive which we have discussed in your theropy sessions, but also incredibly helpful and dedicated to the project. You made me compramise with you ludacris suggestions on occasions lol, and doubt my own logic in cussing matches many a time, which is a verbal skill I grant you. You had to put up with alot from Alec, not so much me. We couldn't have done the project to the standard we did without you. You were also the equipment guru, Cameras, leads, USB's, backups, you sorted us out! Especially when we lost all our recordings - well played there mate. I was really impresseed with your modelling skills, and endless concept designs. You were a massive asset to the team, so well done man.
ALEC
you were alright.
As for the film itself, well......
ALEC
Nah I'm joking I've gotta do Alec aswell, although that would have been great. This term we bonded, whether he wants to admit it or not, our mums would. His maya knowledge I have to say is imense in places, I turned to him whenever I got stuck and he answered everytime, usually with the press of a button! He also has this knack of handing over the mouse to me to continue a task he has been working on, I touch it, and everything goes mental!! I have been able to do things you can't even try to do with the touch of the mouse this term! He was the brains behind the humour, in that our film included alot of wierd noises and grunts, aswell as screams - an Alec trait. I'm still not sure whether the audience will get it, but we do which is all that matters! lol. A negative - brought in roller tycoon to play in the last week of the project, the most important week! WHAT! but he got the work done so I can't complain. I have to say he's awful at cussing matches, I won everytime.
ME
As for myself, I feel I have improved alot this term. I would say I learnt more last time however because it was all new to me, whereas now, second time round I have just been slowly expanding my basic knowledge in areas. One thing I have learnt alot more about is After Effects, layers, and compositing. Maybe thats because of Gareths project asell, but mostly because our whole film had to be composited over live action footage I had to repeat process' over and over. Motion tracking, occlusion layers, time remapping, blending modes, etc. etc. I feel alot more confident in the program now. I also learnt a fair bit about rigging from the infamous Dave Ross, aswell as how bump maps, layered textures nodes actually work.
FINAL FILM
PRO's
I really really like the final outcome. I am most pleased with my animation. Especially the scene where he jumps off the rock and bounces backwards during the escape. The fact we made the characters look like they are actually on the set with the use of occlusion layers and shadows was another positive for me. I also like the fingerprints moving when the character is in motion and how they stop when they are stationary. The character designs worked well, and I feel we did capture the claymation style 80% of the time.
CON'S
I do however have quite a few negatives, which i hate to say, but I have to be honest. I don't like the way the final film lost quality. We tried rendering it as avi., mov, quicktime, mpeg, the lot, but every version seemed to loose the quality and sharpness of our fingerprint textures and make everything slightly blurry. Kind of defeated the object of why we spent all that time getting them on there. Secondly the storyline. The film has a few big errors in consistancy. The characters move from shot to shot slightly, and in one Cornelius is in a completely different pose to the previous shot! We also didn't hold for the establishing shot for long enough. Also as much as I love the humour of our film, i do not think outisde of college viewers will understand the funny noises and outburts we included such as Mcglones grunt, and Cornelius' sudden impatient outburst. He goes from calm to mad instantly. Finally the pan down from the gorilla sign to the cage in the bush was terrible, we could not figure out why the footage lagged but it did no matter what we tried. It has a nasty hand held amatuer effect which we didnt want. Ideally we would have used a tripod, but for obvious reasons this wasn't possible in the zoo. Plus the volume messes up big time on the DVD, all our audio and dialogue goes really really quiet :( Theres more negatives but I dont want to carry on lol
END
So there you have it, with another 2 weeks I think the final outcome would have been 10x better, i think we could have got it to industry standard. It's a close call between MTV cribs and "If I were a Gorilla". I'd say the gorilla project was technically better, but MTV cribs had a better narrative and flow to it. Either way I love both. Jared said it was a good thing that I had negative points about our film, it shows I always want to improve, and a good animator is never happy with their work! I can't wait for next term, Bare Bear WILL be industry standard - 3rd time lucky!
Wednesday 18 March 2009
Hand-in Day Antics
Monday came and the pressure to get the film finished for 5.00pm was high, it almost felt like we were on a task on the Apprentice lol. We were at a fairly comfortable stage Monday morning actually, we just needed to edit the final premier file, add sounds, touch things up, credits, and finally create our beloved DVD. We also had high hopes for an extras section on the DVD which would contain alot of funny footage shot by ourselves over the last 9 weeks, call it "the making of", if you will!
So the day begun by me sorting out Alecs mess of the "why are you just sitting there" scene. I then helped him with countless other errors he hade made before we all began editing the final premier film, with all scenes imported. We rented out the sound hard drive from the college shop, and used it for one sound! lol A broom sweeping sound for Mcglone. Once we were happy with the film and all the audio, we switched the default frame blend off in premier, as it was ruining our stop mo frame by frame animation.
We then set out to do something we've been waiting all term to do - destroy the cage! It was a symbol that the project was complete! It was a really nice day so Tom filmed us on his camera mucking about outside, we did several funny takes of destroying the cage, the funniet being Alec setting it up as if we were about to shoot our live action footage when I trip and crush it on film lol after which alot of swearing follows. We had a real laugh doing the extras and it felt good to have the weight of the project almost off our shoulders.
We then imorted all of Toms extras footage off his camera and made ashort montage of extras for the DVD. exported that as an mov. and that was ready to go.
Time was running out now, by this time it was like 4.00pm and we were sorting out our concept work slideshows for the DVD. Alec had brought in his laptop with Adobe Encore software to create the "DVD of our dreams". I have to say the software is awesome, and was recommended by Dan Dali. Apparently we will use it in the 3rd term to make our showreels so we now have some basic knowledge of how to use it.
Finally after all the menu's were sorted out, and every page linked back to the previous, with all buttons working - we burned the DVDs (5.45pm). Handed them into Jared (6.00pm) and that was that! FINISHED! Just on time. ahhhhhhhhhhh what a relief. Then me Alec, Grigsby, Yaniv and Stewart went for a well deserved pint and a curry!
Thursday 12 March 2009
Finally a Productive Day
Yesterday was pants in the fact that I got actually NOTHING done. We had PPD for most of the day which was a really good session but it couldn't of come at a worse time because we have so much to do! lol.
So today I had to make up for it. I started the day by rendering the beautiful ladies speech scene which Alec had so kindly tidied up for me last night. Once that was done, I composited it, edited and exported as AVI.
Next up I went through all of the dialogue recordings Dave did for us to find the ones we had lost on Alecs HD. We were lucky because Tom had backed them up unexpectadly shortly before the disaster happened. I re edited the sounds and matched them up with the characters lip syncs.
I then photoshopped the final scenes stop mo photos only to find it hadn't been lost on the hard drive so that was a waste of time.
I then animated the final scene in which Cornelius jumps with glee because he's free, then he huffs as the cage comes down trapping him with sweeping Mcglone. I rendered this as it was at the end of the day to see how it was looking and to judge the animation as maya was lagging big time. I was 70% happy with it. I am going to touch it up more and make the fall of the jump not so quick and jerked.
Then me and Alec finalised the design for the DVD menu which was grand.
A very productive day. Unfortunately Gareths project has taken the backseat bigtime lately because I love this one so much. The deadline for his is tommorow and I have a fairly final edit with sound ready. I want to edit it slightly and add a couple of titles tommorow before I hand it in. Other than that I did my best with it. I found it hard to juggle both projects, especially when your really passionate about one and you know it will eventually appear on your show reel. I have enjoyed Gareths alot, I just wish I had more time for it, as I know I could have done better.
DVD Menu - SORTED
As you probably gathered from the title of this post - the DVD menu design is complete. Me and Alec spent a good couple of hours yesterday trying out different possible layouts/designs and got nowhere. We didn't like anything we came up with, and somehow ended up with a shitty twig boarder thing - It was AWFUL! I'm not even going to post up the previous designs as they're THAT bad, plus we didn't save them, because, they were THAT bad.
So today I scanned in my concept work for the 2D section of our DVD, as I had previously taken photo's and the quality was terrible. We soon noticed the difference and decided to have another go at the menu today, this time sticking with our original sketch idea. We bunged our favourite concept sketch of William on the canvas and knew straight away it was going to work. I wanted to have a sketchy font style off the net and Alec agreed but added the finishing touch by doubling up the text layers, changing them to the light blue pencil coulour I had used for my construction lines on William, lower the opacity, angle them, and add a awind filter to get the grainy crayon effect. It looks AWESOME. Simple is always best. We accomplished this is about 20 mins apposed to the 2 hours yesterday! Now to actually make the DVD!....
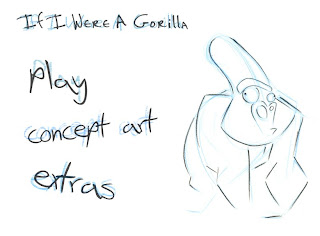
So today I scanned in my concept work for the 2D section of our DVD, as I had previously taken photo's and the quality was terrible. We soon noticed the difference and decided to have another go at the menu today, this time sticking with our original sketch idea. We bunged our favourite concept sketch of William on the canvas and knew straight away it was going to work. I wanted to have a sketchy font style off the net and Alec agreed but added the finishing touch by doubling up the text layers, changing them to the light blue pencil coulour I had used for my construction lines on William, lower the opacity, angle them, and add a awind filter to get the grainy crayon effect. It looks AWESOME. Simple is always best. We accomplished this is about 20 mins apposed to the 2 hours yesterday! Now to actually make the DVD!....

Note: the quality and colour has been lost on this blog upload, however the actual Menu is much better.
Monday 9 March 2009
Long Bod Post
The time has come - final hand in week. I feel unusually ok about this, simply because of the amount of work achieved by Team Pedro during these past 2 months. At present we have enough scenes animated to compile a short incoherent film, however to achieve THE short movie we are aiming for, and that makes sense, we need this last week.
What I thought was minor bad news last week when Alec dropped his hard drive actually turned out to be slightly worse than I thought. I was hoping the files could be salvaged over the weekend or somehow repaired however this is not the case - it's f***** as Alec would say so loudly. We have a few old backups and the remaining days to get back on track it just means later nights this week than intended.
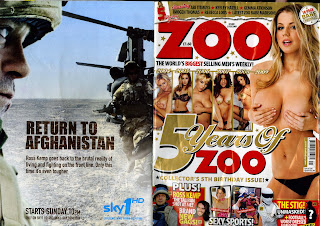
So what to do? Well first priority is to finish animating the last remaining scenes, render them and composite. I think we only have 2 and a half left now - so definately possible. Next priority is editing, getting the shots in order in premier and matching them up with the audio. After this it will be a case of making a short montage of our gorilla zoo footage leading up to our gorilla cage pan down shot. This is the most important shot as it illustrates that our little animated clay gorillas are in actual fact in London Zoo, in a bush, next to the gorilla sign, getting on with their er, day to day life I guess. This idea was inspired by the creature comforts locations, and adds a nice little pun/irony/ i don't know the word/ to the story. Similarly with the Zoo magazine joke.
Next whack in the amazing gorilla song. Tidy, touch up etc. THEN, we could just slap it on a disc as a quicktime file - but thats just LAZY. So we have decided to produce a well preseneted DVD, with a nice menu etc. to display our concept work and extras. We will produce 3 identical discs, one for each of us to hand in, and clearly label on our own copiues the 2 specialist areas we have focused on. That is the plan. It will not fail.
Today saw me animate the rest of the escape scene, which I am fairly pleased with actually. I managed to conquer the backwards hunched over gorilla hop I had so eagerly wanted to achieve. Alec kindly offered to lip sync this scene for me as I was sick of this task, plus he needs the practice :o Ohhhh no I didn't! So yeah we swapped and I worked on William which was a refreshing change. We lost the updated William rig due to the hard drive accident so I had to work on the one which needed "SORTING OUT!". So I sorted out his dirty finger rig which was messing up, and the lack of eyebrow within the scene. I also textured the chest plate, and animated the wave deformer and textures. I left mine to render for tomz.
Tommorow I think I will have to resort to finishing a scene I hate involving Cornelius spouting off about beautiful young ladies. It's gotta be done. Everythings coming together now though and I reckon we will be editing and doing all the fun stuff by thursday! I'm off now to watch the Usual Suspects......
"SORT IT OUTTTTTTTTTTTT!" Alec Smith 2009
" So crack a bottle let your body wobble!" - Class of 09
What I thought was minor bad news last week when Alec dropped his hard drive actually turned out to be slightly worse than I thought. I was hoping the files could be salvaged over the weekend or somehow repaired however this is not the case - it's f***** as Alec would say so loudly. We have a few old backups and the remaining days to get back on track it just means later nights this week than intended.
So what to do? Well first priority is to finish animating the last remaining scenes, render them and composite. I think we only have 2 and a half left now - so definately possible. Next priority is editing, getting the shots in order in premier and matching them up with the audio. After this it will be a case of making a short montage of our gorilla zoo footage leading up to our gorilla cage pan down shot. This is the most important shot as it illustrates that our little animated clay gorillas are in actual fact in London Zoo, in a bush, next to the gorilla sign, getting on with their er, day to day life I guess. This idea was inspired by the creature comforts locations, and adds a nice little pun/irony/ i don't know the word/ to the story. Similarly with the Zoo magazine joke.
Next whack in the amazing gorilla song. Tidy, touch up etc. THEN, we could just slap it on a disc as a quicktime file - but thats just LAZY. So we have decided to produce a well preseneted DVD, with a nice menu etc. to display our concept work and extras. We will produce 3 identical discs, one for each of us to hand in, and clearly label on our own copiues the 2 specialist areas we have focused on. That is the plan. It will not fail.
Today saw me animate the rest of the escape scene, which I am fairly pleased with actually. I managed to conquer the backwards hunched over gorilla hop I had so eagerly wanted to achieve. Alec kindly offered to lip sync this scene for me as I was sick of this task, plus he needs the practice :o Ohhhh no I didn't! So yeah we swapped and I worked on William which was a refreshing change. We lost the updated William rig due to the hard drive accident so I had to work on the one which needed "SORTING OUT!". So I sorted out his dirty finger rig which was messing up, and the lack of eyebrow within the scene. I also textured the chest plate, and animated the wave deformer and textures. I left mine to render for tomz.
Tommorow I think I will have to resort to finishing a scene I hate involving Cornelius spouting off about beautiful young ladies. It's gotta be done. Everythings coming together now though and I reckon we will be editing and doing all the fun stuff by thursday! I'm off now to watch the Usual Suspects......
"SORT IT OUTTTTTTTTTTTT!" Alec Smith 2009
" So crack a bottle let your body wobble!" - Class of 09
Friday 6 March 2009
Cage escape so far...
Good/Bad Day:
Erm Alecs hard drive broke, we lost our backups and some important files, going to set us back a good couple of days to re edit sound and live action footage. Plus side, I animated a whole 9 seconds of the escape scene, and I' m really happy with it so far!
INTRO MUSIC IS SORTED!!!!
Me and Tom found the perfect childish/gorilla mentioning/xylaphone played song today to use as our intro theme - it's sooooooooo good. We searched for on youtube for some gorilla songs and went through some terrible possibilities such as banana splits, marilla gorilla, gorillaz etc. But the answer was there all along, 2nd result on "gorilla song" search is PERFECT. Its been saved and is ready for use...... note: only forst 30secs will be used, and faded out at the la la la la when the camera zooms into the cage in the bush.....
http://www.youtube.com/watch?v=YC2rIo59JLs
"if I were a gorilla, la la la la la, I would eat a big banana la la la la"
http://www.youtube.com/watch?v=YC2rIo59JLs
"if I were a gorilla, la la la la la, I would eat a big banana la la la la"
Thursday 5 March 2009
Animation Progress...
Completed Shots
1) Establishing Shot
2) Cornelius establish shot
3) McGlone establish shot
4) William establish shot
5) Ahhh establish shot
7) William slapped
8) Cornelius screaming
9) Cornelius 'sick of this'
10) McGlone hit by mag
11) Cage Shot - 3 Seconds
13) Cage Shot - will going mental
12) William alerted
14) Cornelius thinking
Shots To Do
6) Cornelius beautiful ladies reading - Nearly Complete
15) Cage lifted up
16) "We're free"
17) Cages comes down
Tuesday 3 March 2009
Hmmm - needs work
The hardest scene so far - the attractive ladies speech. I am happy with all my animated scenes so far, just not for this one. Its very hard to animate the mouth blenshapes because the only way to set a key is through the attribute editor or slider bars, thus meaning you cant see the keys you've set for each expression unless you go into the line graph:

It makes changing durations of keys, deleting them and re timing them v. hard. I have struggled big time with the lip sync in particular. I hate to say it because of time restrictions and I know Alec will go mad, but, I think Im going to re animate the mouth AGAIN.
As for the movements and gestures he is making whilst talking - they are getting there. Today I made progress in having him gesture towards william with his right hand, scan up and down the page, and re grab the mag:
It was tough to mathc the speech with the right movements. I feel it needs slightly more punch - a bit faster, and jitterierrr - if thats a word. I hope to have this scene finished by tommorow eve - rendered. We are on schedule so i can afford to put the extra time into this one, and use thurs, fri and mon to animate the final scene. Alec rendered some good astablishing shots of the the 3 characters today and Tom rendered Mcglone sweeping and being wacked with the mag. Slowly getting there.....
Monday 2 March 2009
A quick update
To be honest theres not alot to update on a day to day basis as animation is in full swing. Myself Alec and tom are all animating each of our characters and trying our very best to make them look like stop motion. I have more shots/scenes than the other guys due to storyline however if work load gets too much I will pass on small sections.
I have found lip syncing to be the most time consuming process so far - Cornelius is the only talking character you see. I had a really bad day the other day as I spent a whole day animating the blendshapes and listening to Dave Ross' voice over and over and when I finally came to animate the actual body after finishing lip sync - the teeth and tongue compleelty messed up and flew everywhere in the scene - I was gutted to say the least and left for home disheartened at the waste of a day.
Friday was better as I produced the short but important blarghh scene. Alec helped me accomplish the exact confused facial expression pulled by Cornelius after William has just slapped himself. Its basically the point Cornelius looses his temper with the Will. that went well and I managed to animate more jerky and stop mo like. I found the key is to animate with less key frames, sharp sudden movements combined with a few subtle ones achieve the nice effect.
I thought I should post Team Pedro's 7 golden rules on how to accomplish the stop mo look after millions of tests:
1. A wave deformer. set to wobble only when the character is in motion. Stops when character is staionary. This effect ahieves the really nice look that the model is being prodded and squashed by the animators fingerprints each frame.
2.Animated bump texture. Again set only to translate when character is in motion. When done right - looks awesomeeee. The finger prionts go all over the shop and add to the stop mo amateur affect.
3.Sharp, stepped, minimally keyed animation. Results a very jittery linear style of animation. Perfecor stop mo even if it is hard to pull yourself away from the nice arcs and perfectly smooth animation you so desire.
4. RAM render at 25fps BUT skip 1 frame per sec in After Effects. Causes the animation to look even more jittery and stop mo like.
5. Occlusion is Vital.
6. Motion track the character and occlusion layer to match the moving camera background - prevents the layer sitting still.
7. Design style. Wallace and Gromit style mouth. Instantly looks like plastacine!
I dont really want to post any of the finished movie scenes so far as it will ruin the final film suprise :s Im currently rendering my new scene so gtg....
Friday 27 February 2009

Thursday 26 February 2009
Even DreamWorks struggled to do what we're trying to do....
Yep, the issues me Alec and Tom are having are not easy to solve. Trying to achieve a stop motion look with Maya is a hard task and by the looks of things, even the best struggle. DreamWorks spents almost a year trying to recreate Aardmans Stop Mo look for Flushed Away using CG. This article I found explains the exact same difficulties they encountered that we are having. Read it guys.
http://www.studiodaily.com/main/technique/tprojects/Putting-a-Stop-Motion-Look-in-the-CG-Film-Flushed-Away_7478.html
We are a team of 3 2nd year animation students, all with basic knowledge of Maya, and a project duration of 8 weeks. We can hold our heads high if we complete this.
http://www.studiodaily.com/main/technique/tprojects/Putting-a-Stop-Motion-Look-in-the-CG-Film-Flushed-Away_7478.html
We are a team of 3 2nd year animation students, all with basic knowledge of Maya, and a project duration of 8 weeks. We can hold our heads high if we complete this.

Wednesday 25 February 2009
Ok so yesterday saw team pedro take a big step in the production process. Not only did we skip the huge task of painting waits but for the first time we gained an idea of how the CG would look composited with our background footage. To be honest we didnt know what to expect, whether it would look blatently CG and if it would fit in with the set. Well were all suprised at discover how good it came out., for a first test anyway.
The morning started with myself and Ally painting weights and touching up our rigs. We had the kind help of Mr Ross. After a while experimenting and skinning I concluded there was absolutely no point painting weights for my model as when skinned it worked almost perfectly with hardly and deformations - lucky i know! Dave assures me this is very unusual, especially for fingers to work fine without tugging on the skin of nearby fingers, but I wasn't complaining! I think alot of it comes down to the way I modelled Cornelius, as I concentrated on keeping neat edge flow and edge loops surrounding all my joints, no triangles etc. Plus the fact that he is made up of very basic primitive shapes. I was over the moon that I could just get on with animating. Alecs Gorilla was almost perfect after the skeleton was skinned, he just needed to paint weights on a few pinkys.
So first step was to import the particular background shot needed for Cornelius' first scene as a targa seq using premier. Then set it as image plane for a new camera. I then created a simple sphere to act as the pebble and allow shadows and occlusion to be created underneath Cornelius. I set its material to "use background cololur" meaning it wouldn't be rendered. I then placed Cornelius in his establishing sitting pose. I wanted him to be hunched over and sat like a real gorilla but the rig didn't allow it which sucked. So I had to settle for sitting him like a human on the edge of the pebble, which I guess you could say is more intelligent anyway?!
Alec then helped me re create the lighting within our live action footage. twas hard. We ended up having to simple ambient lights casting no shadows. One slightly pale grey/pink for the sky sort of colour, and one slightly brown for the subtle glow of the leaves kicking up from beneath him.
I then kncoked up a quick model of the Zoo magazine Cornelius is holding. Needs more work though - I would like it to be slightly reflective and more shiny.
Lastly I attempted a qucik piece of animation and lip sync for a composting test. I just made him take a sigh and look from page to page while humming. Looks OK - will come back to it later, it was only for test purposes. I struggled to animate in a stop motion way as it involves animating frame by frame badly - whereas I like smooth CG lol. As Alec said its like learning new animation principles all over again if we want to achieve a convincing stop mo look.
Yeah then rendered a batch, imoprted both occulsion and master layer into after FX.....

Tuesday 24 February 2009


Friday 20 February 2009
Boring post...
Really sorry to post another entry with no pictures or evidence of progress but lately the team have been solving issues and editing our live action footage. I'm going to break it down into what has been accomplished over the last week, as it seems like nothing to the untrained eye reading my blog this week...
Monday - All brought in our set objects. Meeting in preparation for zoo trip. Problems and solutions discussed and documented. Shots and angles planned out. Camera pan tests. Phone call to London Zoo. Gareths project.
Tuesday - London Zoo trip
Wednesday - Transferring footage from camera and videocam to PC. Organising footage and photos into folders. Backing up project. Picking favourites. We tried to figure out a way to achieve a stop motion look with the photos or footage we had. Alec cracked a method of acheiving stop motion look with photos:
1. Import first image of sequence into photoshop - set as background layer.
2. Import the following photos in the sequence as layers.
3. Individually adjust each layers oppacity 1 at a time in order to align with background layer. (remember to slap the oppacity back up once done)
4. Re-size canvas to compensate for loss of frame.
5. Make sure all layers are visable and save as PSD.
6. New project in premier - settings - 24FPS.
7.Import PSD as a sequence in premier - NOT footage.
8. Slap layers into timeline.
9. Resize each frame to the same size.
10. Change duration of each frame to 1sec, and resquish them back together.
NOTE: If you want 1 second of footage then this requires 12 frames. 2secs - 24frames.
10. Export as movie - uncompressed - millions of colours +
11. Re-import movie and change duration of movie to 1 second (assuming your dealing with a 12 frame segment) The project is set to 24fps so it will double your 12 frames and hold on each one for twice as long.
12. Simply copy and paste to loop shot.
13. Export as movie shot.
A long long process but the it provides awesome high quality stop motion results. It also stops the twigs at the front of the cage moving around too much as it would be way too difficult to composite. We did this pretty much all day.
Thursday -
Massive meeting about our storyline. 3 shorts idea scrapped, instead make 1 slightly longer short. Storyboarded & decided on dialogue. More of the "GAY" photoshop, premier routine. We then had the fun task of recording dialogue! We casted Dave Ross as Cornelius, Alec as William, and Tom as McGlone. Finalised disc. Went to transfer audio from CD to PC when hit with an error - CDA. files not compatiable! We had to spend a good hour or so converting them all to MP3's on a shitty MAC. Me and Alec then stayed late matching up the audio with our finished shots in one big premier file. This would give us an idea for timing and allow us to know which shot to import into maya for each lip sync and character animation piece. We had a really good animatic/final live action edit at 6.30pm.
Friday -
10.30am - file corrupt. **** sake. I was too angry to continue work on Team Pedro and worked on Gareths project. Me and Alec stayed late once again and got the live action edit finished with audio for a SECOND time! Was worth it though, it's better now if anything, and ready to be animated on top of. Hurrah!
So yeah that was the boring but much needed week. Next week should be much more fun - painting weights, importing sequences in, lip syncing, and animating!
Stay tuned.
Tuesday 17 February 2009
London Zoo Trip
The trip was a success! well sort of. It was a really really really funny day! The plus point is we managed to smuggle the twig cage and pebble in with no arrests. The negatives were - it cost £15 each, it was a muggy day, it was really busy because of half term, and to top it off the gorillas decided to stay in the indoor section of the cage for the best part of the day - typical.
We headed straight for Gorilla Kingdom upon entry after a panic stricken ordeal at the entrance - Alec was really worried we'd get searched for some reason. Anyway it was clear that there were no gorillas in the open enclosure so we wandered inside. We were a bit peeved at first because the gorillas were all sitting down behind big glass windows with loads of people crowding around the barriers making it almost impossible to achieve the nice pan down shot we so badly wanted. Plus there was no shrubbery or bushes indoors apart from a little penned off area containing a few palms surrounded by high netting. There were a few guards around, one elderly lady who insisted on no flash phtography and some guy wearing a britney spears type micraphone. He immediately started blaring out information right next to us so that location was out of the question - security was tight lol.
We compensated and managed to place the cage in a bush right next to the gorilla kingdom sign. We filmed a few nice pan shots down here. We were fairly happy with this however it was not ideal - more of a backup. We also placed it near monkey cages and attempted pans there, however the cage looked blatently empty so that was gay lol.
We then went off to a discreet area of the zoo where there were a few bushes that resembled the ones near the sign we had filmed - perfect for our still shots. We filmed and took pictures of all the camera angles needed. By this point about 10 people had asked why we were carrying a twig cage around the zoo, and what it was for. 2 of the zoo keepers stopped us but when we said it was an art project they retreated looking rather grumpy. 3 guys crowded round an empty 30cm high twig cage in a bush taking pictures and making funny noises must have been a hilarious sight!
So yeah we were about to call it a day when we decided to go back to the inside gorilla cage and try and chuck the cage over the shrubbery fence to get our gorilla pan shot! It honestly was like a military operation - Alec threw the cage over the penned off palms when none of the keepers were looking, then positioned it throught the bars! It was so funny, the shear effort we went to to get a twig cage in a bush unoticed and film it. We got a couple of ok pans in the end and headed back to the exit.
BUT! When we walked past the open enclosure gorilla cage on the way back they were out! So we quickly postioned the cage in a nearby bush, and began pan shots from the roaming gorillas down to the bush. The battery was just about to die when I pulled off the perfect steady pan! It literally was the last shot of the day, I panned down to the bush, stopped for a second and the battery died! Too lucky. Anyway we were really pleased with that last shot and headed home.
All in all a great day out and all live action footage and pictures are ready to be imported into Maya tommorow. Plus we managed to film a few sneaky extras.... ;)
Monday 16 February 2009
London Zoo: "Nah you can't bring that twig in here mate"
Team Pedro met today to display our amazing naturalistic set objects to one another. Tom had made a lovely Gorilla cage sign with a piece of cleverly crafted bark and red paint. I showed pictures of my elegent precision engineered twig cage. Oh and Alec found a rock on the way to college.
Yeah so everything was going swimmingly with the set, unfortunately my chat with London Zoo help line didn't go quite so well.
I rang up and firstly asked about any student discounts? - No.
Can we film using a small digital camera (the type all familys bring to the zoo)? - Fill out a form online.
I then enquired about bringing a tri pod to the Zoo tommorow explaining it was for a college project - I got another point blank No. Apparently you can only bring a tripod if you are a member of the press.
So on to the more important question for this charming woman on the phone - surely this would be a yes, there is no possible reason for it to be another no....
"can we bring a few sticks and a pebble into the zoo?" .... all hell broke loose.
Defensive isn't the word, the woman couldn't comprehend that I didn't want to harm the animals with the pebble and that the twigs would not be used to stress out or irratate the gorillas!
No I replie, simply to be placed on the grass in a quiet area of the zoo for a college project.
"I just don't understand why you would want to bring sticks and a rock into our zoo sir, it sounds very suspicious and could be something used to distress the animals and provoke attention from the zoo keepers"
The conversation continued and I ended up having to basically explain CG compositing to the lady who still humed and harred about why I would want to bring in such dangerous items lol. Anyway it ended up being a no.
So we're going up tommorow anyway - I'll let you know how it goes!
Building a Cage . . .
Practical work! At last some work I could get messy with and use my hands rather than a mouse! I was given the task this weekend of constructing the live action twig cage our animation would take part in. Alec was to aquire the rock, Tom the small sign and camera. All of us agreed to bring in our objects for Monday ready for a test run of tommorows trip to London Zoo.
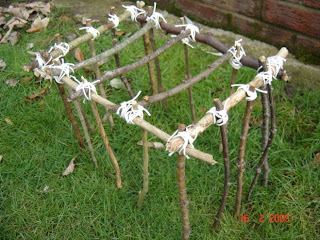
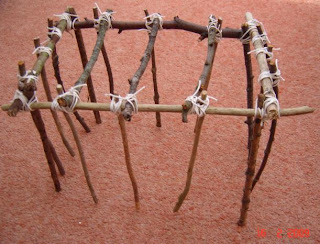
So I ventured up my local woods on Sunday collecting as many straight sticks and twigs as I could to build the cage with. It was slightly more difficult than expected because the recent weather had made most sticks completely dry, hollow, flimsy etc. I collected about 20 perfect sticks (size and width) and set about gluing them together.
The cage was to be built A4 paper size to allow for handling and the rock etc. I constructed the cage using string to tie the sticks together along with glue for extra stabilty. I was suprised at how fiddly and delicate working with sticks and string is, especially trying to get the whole thing to stay still and not collapse every 2 seconds! I eventually managed to stabilse the cage by adding a cardboard base which I later removed. It ended up taking me the whole day to finish . . . but it was worth it ;) .....


Thursday 12 February 2009
Wednesday 11 February 2009
Rigging Started & Blendshapes Complete!
"All in all good sh** is going down." Alec Smith 2009
That sentence summed up today pretty well as we had quite productive progress. I hit a major problem last night in that when I tested how the texture on the mouth looked after being blenshaped it was badly strecthed and deformed. I consulted Alec this morning and he played around with trying to environment map it and blend textures - all sorts of shizzle - but alas we got no where. Luckily Dan Dalli was in the room to seek advice from and he suggested a projection technique he had used in the past with lightwave. If we could project a texture onto our mouth rather than UV map/wrap it then the finger prints would stay stationary no matter how the mouth deformed or moved. I searched it on google and sure enough he was right there is a simple tick box selection within maya to apply a 2D projection rather than a normal. Sweeeeeet! It solves our problem because the we can now also animate the projection plane allowing the prints to randomly move around the mouth - achieving the stop motion look.
It does however make me wonder how you would go about solving the problem if you were texturing say a realistic mouth with stubble, hairs, wrinkles etc and you create blenshapes which stretch your texture placement? The projection would not work as it would result in stationary wrinkles aswell as no movement of skin? We are lucky that we want our prints to move - just not stretch. It seems like an issue with no answer? how can you blend geometry without expecting the texture applied to it to morph and stretch? Do you blend textures? I honestly don't know - Autodesk can't have not thought about this one, or as Dan Dalli said - there are probably people writing scripts and plug ins for this problem - earning bundles of cash!
Anyway here are the mouth blendshapes fully textured using bump 2D projection - we scrapped brownian layered texture as we have a new trick up our sleeve for achieving the ripples....
The simple tick box...

A quick playblast of the blenshapes in action with a wave deformer applied as well for rippling stop mo action.... Its V short tho...
Rigging began after the blenshape and texture problems were solved. I hate rigging, I don't find it visually appealing as say modelling or animating - its just, well, technical/maths/numbers! (sorry dave!) I have basic rigging knowledge from 1st year with Dan, and I attempted to rig one of my own characters over the summer holiday. I managed to get the rough skeleton of cornelius pinned out today. I created IK's for the legs which wasn't too difficult. I gave him 2 extra bones jolting out from the top of his back to allow movement for the shoulder blades. One bone has been placed almost in a neck like fashion to allow the head object (seperate object) to be parented to this part of the body. I will create a spline handle for the spine tommorow, as I think I can remember how. Hands and fingers will be done tommorow also with great difficulty! I quickly smooth bined this to my model and supriseingly it didn't look to bad - obviously weights need to be painted, but all in all it seemed animatable. I want to spend a good week on the rig, getting it fully functional with easy handles and controls attached, as well as painting weights. I will also touch up my model while I fiddle with the rig. Here is the rig so far, very simple...


That sentence summed up today pretty well as we had quite productive progress. I hit a major problem last night in that when I tested how the texture on the mouth looked after being blenshaped it was badly strecthed and deformed. I consulted Alec this morning and he played around with trying to environment map it and blend textures - all sorts of shizzle - but alas we got no where. Luckily Dan Dalli was in the room to seek advice from and he suggested a projection technique he had used in the past with lightwave. If we could project a texture onto our mouth rather than UV map/wrap it then the finger prints would stay stationary no matter how the mouth deformed or moved. I searched it on google and sure enough he was right there is a simple tick box selection within maya to apply a 2D projection rather than a normal. Sweeeeeet! It solves our problem because the we can now also animate the projection plane allowing the prints to randomly move around the mouth - achieving the stop motion look.
It does however make me wonder how you would go about solving the problem if you were texturing say a realistic mouth with stubble, hairs, wrinkles etc and you create blenshapes which stretch your texture placement? The projection would not work as it would result in stationary wrinkles aswell as no movement of skin? We are lucky that we want our prints to move - just not stretch. It seems like an issue with no answer? how can you blend geometry without expecting the texture applied to it to morph and stretch? Do you blend textures? I honestly don't know - Autodesk can't have not thought about this one, or as Dan Dalli said - there are probably people writing scripts and plug ins for this problem - earning bundles of cash!
Anyway here are the mouth blendshapes fully textured using bump 2D projection - we scrapped brownian layered texture as we have a new trick up our sleeve for achieving the ripples....

The simple tick box...

A quick playblast of the blenshapes in action with a wave deformer applied as well for rippling stop mo action.... Its V short tho...
Rigging began after the blenshape and texture problems were solved. I hate rigging, I don't find it visually appealing as say modelling or animating - its just, well, technical/maths/numbers! (sorry dave!) I have basic rigging knowledge from 1st year with Dan, and I attempted to rig one of my own characters over the summer holiday. I managed to get the rough skeleton of cornelius pinned out today. I created IK's for the legs which wasn't too difficult. I gave him 2 extra bones jolting out from the top of his back to allow movement for the shoulder blades. One bone has been placed almost in a neck like fashion to allow the head object (seperate object) to be parented to this part of the body. I will create a spline handle for the spine tommorow, as I think I can remember how. Hands and fingers will be done tommorow also with great difficulty! I quickly smooth bined this to my model and supriseingly it didn't look to bad - obviously weights need to be painted, but all in all it seemed animatable. I want to spend a good week on the rig, getting it fully functional with easy handles and controls attached, as well as painting weights. I will also touch up my model while I fiddle with the rig. Here is the rig so far, very simple...


Tuesday 10 February 2009
Formative
Today we had formative with Jared in which we graded ourselves and evaluated our progress so far on the project. It was a good chance to find out what was lacking from our blogs so we can rectify it for when summative comes around. I did fairly well all in all, achieving goods in most areas except research - as I have rarely compared it to existing work of others. It's wierd because on the last project I did alot of that - posting up good reference images and films we should aspire to etc. However with this unit I have kind of forgotten all about that and just got on with documenting our production. As of today I will take more time to study other work and post any relevent information, designs, or films I come across that could help us or maybe even influence us. In fact here's a few inspirations I should have posted up weeks ago.......
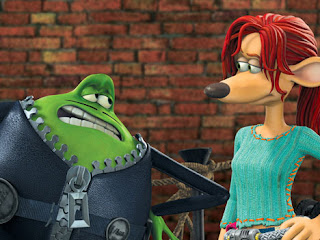
Flushed Away
Aardman & Dreamworks collaborated to make this CG feature length film about a rats adventure down in the sewers. They attempted to re create the Wallace and Gromit style of animtion but using 3D software rather than plastercine. In my opinion they were successful in copying Aardmans character design styles i.e wide looped mouths, shiny black noses, square teeth etc. However the animation did not look stop motion enough. There was not enough jerks and fast movements to convince the audience it had been hand made and animated frame by frame. Because of this smooth animation it became simply another CG movie which had characters that happened to look similar to that of W&G. Another major flaw in their attempts to re create Aardmans stop mo style was their lack of texture! I don't think I saw one fingerprint, misplaced blob, or even a wrinkle smudge on the characters throughout the film. Everything was highly polished, vibrant in colour, and seemed to be imaculately smooth. It was as if no hand had ever touched the clay models! Oh but wait, their CG aren't they, of course. They should have put more effort into recreating what Aardman achieve by using their bare hand, slight subtle obscurities in the plastercine, pencil jabs, smudges, blotches of colour. Nothings perfect with stop mo. Unfortunately this let them down.

Very well made and simplistic. In fact the series was made using claymation techniques so they got the look spot on lol. Maybe we should just make ours with clay? Instead of using a computer!!!!
Flushed Away
Aardman & Dreamworks collaborated to make this CG feature length film about a rats adventure down in the sewers. They attempted to re create the Wallace and Gromit style of animtion but using 3D software rather than plastercine. In my opinion they were successful in copying Aardmans character design styles i.e wide looped mouths, shiny black noses, square teeth etc. However the animation did not look stop motion enough. There was not enough jerks and fast movements to convince the audience it had been hand made and animated frame by frame. Because of this smooth animation it became simply another CG movie which had characters that happened to look similar to that of W&G. Another major flaw in their attempts to re create Aardmans stop mo style was their lack of texture! I don't think I saw one fingerprint, misplaced blob, or even a wrinkle smudge on the characters throughout the film. Everything was highly polished, vibrant in colour, and seemed to be imaculately smooth. It was as if no hand had ever touched the clay models! Oh but wait, their CG aren't they, of course. They should have put more effort into recreating what Aardman achieve by using their bare hand, slight subtle obscurities in the plastercine, pencil jabs, smudges, blotches of colour. Nothings perfect with stop mo. Unfortunately this let them down.


Notice the difference in clarity? For once we don't want the polished, sharp, completely smooth look. We want the finger pushed, wobbly edged, smudged look which makes claymation so unique. We hope to better Dreamworks in recreating this style!
Deadline
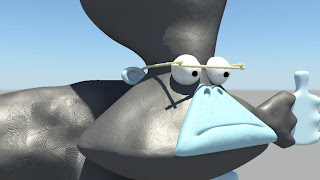
A short CG film produced by Aardman a while back using Maya. I love the humour in it, and the character designs. This is another example of an attempt to recreate of stop mo animation. In my opinion this one was slightly more successful in achieving that than flushed away. It had more jerky movements and flappy poses. The textures are slightly more drab and unsmooth aswell. It went on to become a series called "The Presentators" on Nickelodeon. Getting there....
According to the Aardman CG department who worked on the shorts, they were not simply mimicking the look of the company's traditional clay-model animation with "The Presentators." Rather, trying to apply digital techniques to enhance the appeal, timing, and strong design for which Aardman's claymation films are known.
An excuse maybe?!
http://www.youtube.com/watch?v=fbm5HJ9cohY
Here is a short interesting article about the series..
http://www.cgw.com/ME2/dirmod.asp?sid=&nm=&type=Publishing&mod=Publications%3A%3AArticle&mid=8F3A7027421841978F18BE895F87F791&tier=4&id=CAAC173059C44AAA84B96E0FD53EA3E8C44AAA84B96E0FD53EA3E8 

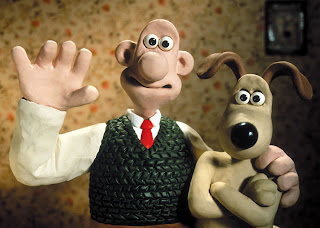
Creature Comforts
Of course other typical inspirations from the likes of Aardman would be Creature Comforts, which actually is very relevent to our film as it deals with animals. I was interested in how they portrayed a gorilla in claymation, was there an episode involving a Gorilla? Yep....

Very well made and simplistic. In fact the series was made using claymation techniques so they got the look spot on lol. Maybe we should just make ours with clay? Instead of using a computer!!!!
Monday 9 February 2009
Delays
Well it's Monday evening and little has been done for our project over the last week due to untold amount of lectures and other units getting in the way! I spent all of today editing my footage for Gareths unit - 203, which I feel is coming along really nicely now, especially now I have audio to match my cuts and pace to.
Tommorow is formative with Jared so hopefully we can have a good chat about what needs to be done and how well we're doing time wise. I'm unsure on whether we're behind schedule as we have almost completed modelling (90%) and texturing (80%), so that leaves rigging and animation left, as well as building our set, compositing and dialogue. We are at the mid point of the unit so I feel we aren't doing bad, but could be doing better if we had more time to spend on it - hoepfully Jared will see it that way.
Anyway as of tommorow it's unit 204 for the rest of the week! Team Pedro are still going strong!
Friday 6 February 2009


Wednesday 4 February 2009
Mouth tests
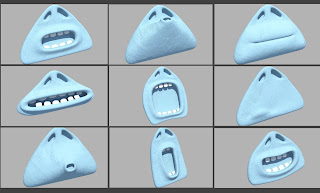
Ok so yesterday myself and Alec spent the day experimenting with mouths for our gorillas as it was kind of a modelling priority. We discussed thoughts and I showed him my expression sheet to give him an idea of the sort of mouth I was invisinging. We agreed it needed to be an actual hollow mouth rather than a simple tube like ring that everyone does when they can't be arsed to do a proper mouth (guilty as charged with Lil G!). In that case to be a proper mouth and still look like playdo we would have to go down the wallace and gromit style route. I explained to the guys that if this piece is to be show reel worthy we should include teeth and make it one hollow, fully blend shapeable, playdo mouth - industry standard - u get me.
So we set off on an adventure to see who could make the best mouth first - sticking to our designs of course. Alecs Gorilla - William has a long droopy shaped mouth, where as mine - Cornelius a stretched triangular shape. We both succeeded by mid-day in creating an open hollow simple mouth with nostrils - all one piece of geometry. I tweaked mine and placed it on the gorilla to get an idea for size and made a quick set of nashers to get a feel for the how the mouth could look mid sentence. I spent a bit of time texturing it aswell to get an idea for how clay-like it looked. Both our mouths looked great by the end of the day and Alec even began making a few simple blendshapes for his which worked perfectly - ooo's, ahhhh's, eeeee's etc.
We were both suprised how easy it was to model a mouth when you dont complicate things and think about poly count, rings around mouth, edge flow, complex throats etc! KEEP IT SIMPLE!Just start with the basic shape, extrude inwards and work from there, adding detail as you go, keep edge loops to a minimum and remember - smoothing helps alot.
Anyway so yeah I grabbed a few screenshots of how it was looking wednesday evening....
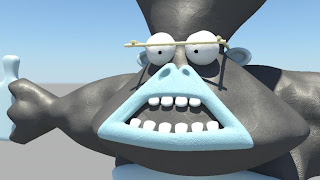
(It is a hollow mouth not a ring mouth! It just looks like a ring mouth because I pushed it into the head so you can't see the back of the mouth/throat which is also blue. I need to pull it out a bit)
However.... It was not until today that I hit a few snags with my mouth. Alecs was working great, the blendshapes looked so simple yet effective, but mine was really really hard to blend into a new expression because of the amount of vertex's I had modelled it with, and the complexity of the shape. Closing it was just about managable but not without pinching and a huge lip. As far as OOooo's and eeee's, it just couldn't hack it. So I compared mine to Alecs and realised I would have to restart the mouth. The difference was Alec had modelled with far less polygons and used a simple rectangle which when smoothed produced the rounded edges needed. His mouth could be literally squashed into all the shapes needed without deforming and had no extra edge loops added for roundness. I copied his style of modelling and applied it to my triangle shape and after half an hour or so had a much more efficient and functionable mouth. We both agree it doesn't look quite as good as my previous mouth (above) but it will be far easier to animate and blend. I am going to produce my blendshapes tommorow and post up the vids of them in action, I will also post up the screenshots of the new mouth aswell as some funky bamboo glasses I modelled during lunch yesterdaY!.......
So we set off on an adventure to see who could make the best mouth first - sticking to our designs of course. Alecs Gorilla - William has a long droopy shaped mouth, where as mine - Cornelius a stretched triangular shape. We both succeeded by mid-day in creating an open hollow simple mouth with nostrils - all one piece of geometry. I tweaked mine and placed it on the gorilla to get an idea for size and made a quick set of nashers to get a feel for the how the mouth could look mid sentence. I spent a bit of time texturing it aswell to get an idea for how clay-like it looked. Both our mouths looked great by the end of the day and Alec even began making a few simple blendshapes for his which worked perfectly - ooo's, ahhhh's, eeeee's etc.
We were both suprised how easy it was to model a mouth when you dont complicate things and think about poly count, rings around mouth, edge flow, complex throats etc! KEEP IT SIMPLE!Just start with the basic shape, extrude inwards and work from there, adding detail as you go, keep edge loops to a minimum and remember - smoothing helps alot.
Anyway so yeah I grabbed a few screenshots of how it was looking wednesday evening....


(It is a hollow mouth not a ring mouth! It just looks like a ring mouth because I pushed it into the head so you can't see the back of the mouth/throat which is also blue. I need to pull it out a bit)
However.... It was not until today that I hit a few snags with my mouth. Alecs was working great, the blendshapes looked so simple yet effective, but mine was really really hard to blend into a new expression because of the amount of vertex's I had modelled it with, and the complexity of the shape. Closing it was just about managable but not without pinching and a huge lip. As far as OOooo's and eeee's, it just couldn't hack it. So I compared mine to Alecs and realised I would have to restart the mouth. The difference was Alec had modelled with far less polygons and used a simple rectangle which when smoothed produced the rounded edges needed. His mouth could be literally squashed into all the shapes needed without deforming and had no extra edge loops added for roundness. I copied his style of modelling and applied it to my triangle shape and after half an hour or so had a much more efficient and functionable mouth. We both agree it doesn't look quite as good as my previous mouth (above) but it will be far easier to animate and blend. I am going to produce my blendshapes tommorow and post up the vids of them in action, I will also post up the screenshots of the new mouth aswell as some funky bamboo glasses I modelled during lunch yesterdaY!.......
Tuesday 3 February 2009
Quick Facial...
Right well considering we've been off the last 2 days and I dont have maya at home I had to resort to doing more concept work to keep the juices flowing. I say resort, i actually really like the design aspect of a project, particuarly facial expression boards. I decided to do one for Cornelius because myself and Alec are still quite unsure of how we are going to achieve our gorilla mouths to represent something similar to that of wallace and gromit when they are open. An expression board is a good way of seeing how the mouth will deform from the simplest of movemnts to the more extreme. It gives a good idea of the blend shapes needed and how to actually construct the hollow mouth. Cornelius rarely opens his mouth wide unlike William but does still need the ooo, ahhh, eee sounds needed for lip syncing and quality of animation. A still mouth or a simple tube like style (which I used for Lil G in Cribbin) is far to simple and obvious for year 2. I believe we can achieve the wallace and gromit style mouths however it will take time and patience - but it will make it show reel worthy. Alec mentioned maybe modelling like 4 or 5 seperate mouths and changing them between frames however I think this may look to drastic of a change - I think blend shapes is the way forawrd. Anywho me and Ally Babes will discuss mouths tommorow and reach a soloution. Hopefully this quick facial expression board I produced today will help.....


Monday 2 February 2009
Snow use going in!
College closed today and tommorow because of heavy snow! Not good as far as project progress goes as I don't have maya at home to continue work, but it does mean I can build a snowman :D I will continue concept work - facial expression sheets for Cornelius etc. I hope the snow doesn't knock much more than 2morow off our tight schedule though. . . .
Wednesday 28 January 2009
Early texture tests...
Today we had contextual studies throughout the day leaving minimal time to work on our beloved project which was a shame. Although myself and Alec were determined to test out some textures on our models so far. I know it's jumping the gun a bit considering the modelling isn't completed and texturing is not scheduled for a weeks time - however there is reason. It is difficult to stare at my plain Lambert model and judge my Gorilla design on terms of how play-do like it is. Secondly alterations in the design can be made if it is not looking like it could be made from clay i.e believabilty and realism. Some of my gorillas design aspects were far too jagged to be modelled from clay, even a texture wouldn't prevent it from looking impossibly hard edged. Thirdly we were both quite bored of modelling and it made a change!
Texturing is a weak spot for me admitidly, I have basic knowledge in UV mapping, creating textures and bumping but it doesn't go much further. In order to achieve a play-do/clay texture I learned it would involve a layered texture approach involving alpha channels and playing around wih the input and output nodes - allof which i'd never touched.
Alec created a simple finger print texture with a few hairs and smudges in photoshop and applied it as a bump to the model, however we both agreed the geometry was far to flat and smooth still and so I suggested a second wavy bump to give the effect of moulded dents etc. We played around with a few default maya textures and found that the brownian one when enlarged worked perfect to give this moulded look. I then struggled to understand how we would achieve placing our other finger print bumps on top of a bump! Mr Grigsby helped for a long time and explained layered textures to my aswell as transparency, alphas and how to navigate around the blinns node attributes. He also gave our scene an awesome daylight light using mental ray settings in about 2 seconds flat! Anyway we managed to get there in the end by making the finger print bumps very soft and faint, and the browsian as vivd as possible, then sliding the alpha down so the two overlayed nicely together. Alec changed the scale and UV repeat options to achieve a really nice random look. We increased the number of finger prints on our jpeg and used Alecs genius tiling method so no image edges appeared when repeated. Oh and got rid of the hair marks, they looked pants.
I am really happy with this as a first test, and both of us agree it is almost the finished artical in terms of the tecture we're after! I will post intructions on how to create it up here soon as I need to remind myself of the steps, aswell as our 2 bump jpegs. Below is a test render of the texture on the model so far...

Tuesday 27 January 2009
Modelling begins....
Thought I'd post a few snaps of how the modelling of Cornelius is going. These are only the intial blocking out stages, he is to be worked into and given more detail and smoothed. I imported my front and side view planes as references. Alec and I have sat next to each other during these intial stages to make sure we are modelling similarly, however his take on the design is slightly different than mine - which is a good thing as william must look odd and slightly exaggeratted. Any who heres a few pics of the basic structure of Corn....
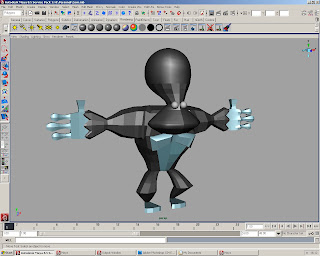
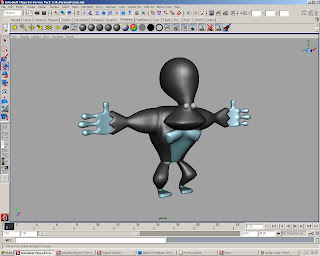
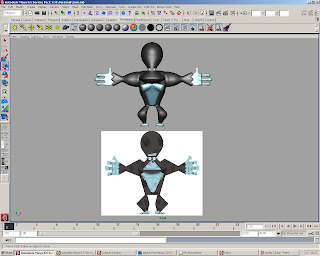


Monday 26 January 2009
Initial Obstacles
Basic Modelling
Moral is on a low, negativity is high, Team pedro suck..... Just joking we are the complete opposite I just know it winds Alec up. Today myself and Ally babes began modelling the gorillas- properly, while Tom made some helicopter thing for his other project. Straight away we both ran into issues with the 2D concept designs converting to 3D. The way the head attached and was shaped, the way the muscles extended from his shoulder, his body shape, hands etc. All these problems seemed to rise from what looked like a very simple design! We decided that I had made a few mistakes with my front and side views matching up - my fault granted. It was hard to invisinge this particular design from a side angle. Anyway we decided to break it down and discuss how it actually worked and arrived at some decisions on how the design needed to be altered to work. We agreed the body was a simple rectangle pinched at the bottom. The head will sit on the body seperately from the body, not part of the body mesh and rigged seperate - lec assures it will be alot easier and solve problems of necks and wierd stuff happening. We can just parent it later and as Alec said it will look like the head was just stuck on with playdo anyway. The muscles are 2 extruded cyclinders really, just shaped and rounded. I still need to persuade Alec to have them start thick rather than pinch when they meet the body cause that looks pants, and is just cutting corners in my eyes, we can pull off the big muscle shoulders, as I feel overlapping won't be a problem because of the claymation style. Hands caused issues as we arrived at the conclusion that I had designed rather square/jagged gorillas when in fact they should really be rounded because of the playdo aspect. Therefore I think I am going to go with Ally babes on this one and rounded the hands and fingers more. Legs and bum were fine, no issue there - as yet. Head is getting there, still negotiating bottom shape of head. We are keeping poly count low at present and modelling really simply as i have a feeling textures will make our models not detail in geometry. We are allowing ourselves till next wednesday to have models finished completely ready to texture as I will be away thurs and fri of this week. So yeah problems are getting sorted early which is a good thing - i just wish Alec was more positive....
"But, but.... wait, I..........uhhhhhhhhhh uh arh uhh" Tex 2008
Thursday 22 January 2009
Character Sheets Revisited
After shwoing team Pedro my character sheet of Cornelius we agreed the design was definately getting there and that it just needed cleaning up a bit. I decided I would like to attempt a concept in Photoshop as I have never used it as a mdeium in design work before. You are able to achieve sharp accurate proffesional drawings in it and constantly change things that look wrong unlike with the paint I used beforehand where no mistakes can be made. I was not too happy with my Cornelius painted character sheet as it looked a bit rough and uneven. I attempted to do the dumb gorillas character sheet in Photoshop to compare it with my hand drawn and painted one, the results were MUCH better. I was really happy with the photoshop version and so re-did cornelius' sheets using the same approach. Plus in photoshop you are able to match up the proportions and angles to ensure it makes sense from all angles! The 2 sheets I have completed so far can be seen below ....
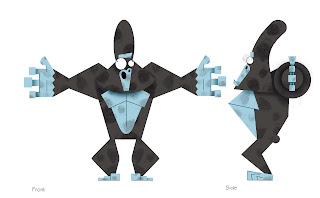
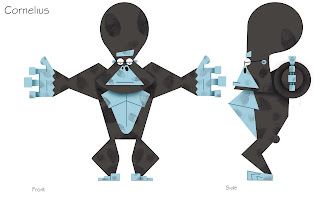
I attempted a 3/4 view of the dumb Gorilla but it was too hard with no reference image to get the perspective right so I will most probably draw the 3/4 for both characters. Below is my attempt....
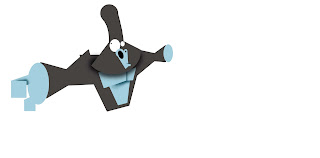
As for back view, fellow team mate smith believes they will not be needed for the modeling process. We begin modelling on Monday, as scheduled, and I will try to get a rough back shot of each gorilla skecthed over the next couple of days just for reference. I doubt I will create the back views in photoshop for time reasons. I am pleased with group progress so far, all is well... we will meet tommorow and begin maya tests and tidy up unfinished drawings and views.
Tuesday 20 January 2009
Character Sheets
After showing the guys my final 3 Gorilla designs they decided they prefered the bannana head design (1). I totally agreed and so next up on the things to do list was to develop the body slightly further and start drawing the front, side, back and 3/4 views of Corneliius and William. I started this today at home and was suprised at how long it took just to do front and side of Cornelius, as the proportions had to match up exactly from both views as well as make sense. I also struggled to achieve a body which suited the design and is able to be rigged. I think I succeeded after a long day. He does have huge muscles but i think because of the claymation style it is ok for overlapping to occur when joints are bended, it will simply look like the play do is combining with itself. Plus all gorillas have big arms and muscles so its kind of hard to steer clear of that fact in the design. I made the hands involve 3 simple square shaped fingers and a thumb - not too difficult i hope. Legs are similarly shaped to arms but smaller. I tried to make all parts of his body a simple shape that could be easily modelled in maya as well as if he was to be modelled in real life play do. I then coloured the model sheet with water colour paints as I wanted a change of media from pencil - its boring me now! Also I achieved a really nice clay texture effect by dabbing and making randow brush marks - happy accident I guess. Anyway I will do back and 3/4 tommorow for Cornelius and as for the dumb one it will probably take up thursday and friday. I would like to get some pose sheets done over the weekend aswell....
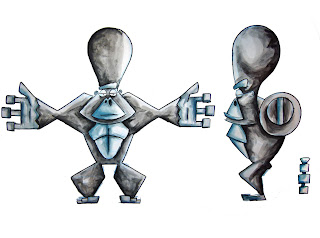

Monday 19 January 2009
Gorilla Concept Work
I have spent the last few days drawing hundreds of different gorillas, dumb and intelligent. It has drove me a bit mad as its a lot harder than initially expected. I am trying to design a variety of different styled Gorillas, curvy, hard edged, square, rectangular, realistic, simplistic, abstract, play -doey, spherical, you name it - i've tried it. I've been skecthing gorillas every minute of my spare time in hope that I come across a design that gives me the "yes thats the one!" feeling!
I started by researching gorillas on the net, looking at images of them - cartoony adaptions by other people aswell as real life photo's. I could post them up here on the blog but it's pointless as they're everything from page 1 - 50 on the google image search of gorilla, funny gorilla, cartoon gorilla, etc etc. There's too many reference images I've used to show you where my inspirations have come from. I may post a few of my favs at a later date to show you the few that grabbed my attaention and I decided to adapt and develop. Below are my very very rough concepts which I struggled to find any I liked:
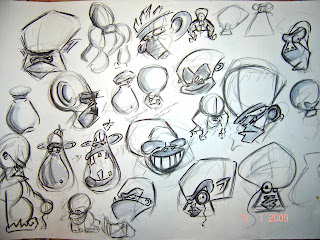
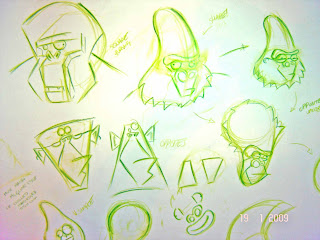
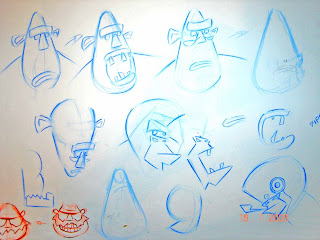
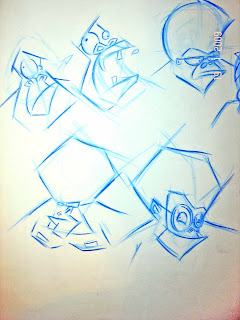
I showed the guys these loose thumb nails and we agreed on the 3 designs we liked most. I then went on to develop the 3 in a way which would give us more idea of how they may look with say a body or tidied up a bit. We chose one of the green sketches with the bannana shaped head design, one of the blue sketches which was a sort of potato head/totem pole wild design, and lastly another of the blue sketches which reminded me and Tom of the Gorillaz sort of style, very jagged and angular. I then produced a few more sketches of the 3 favoured designs:
1. Bannana Head Shape Design
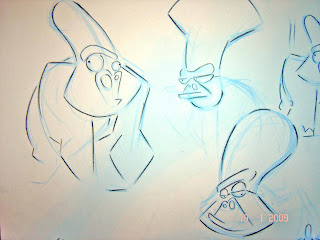
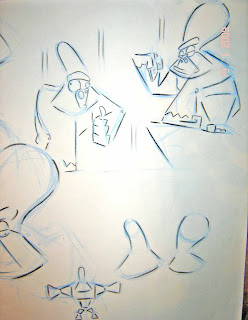
2. Totem Pole / Potato Design
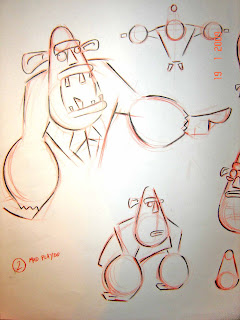

3. Gorillaz Design
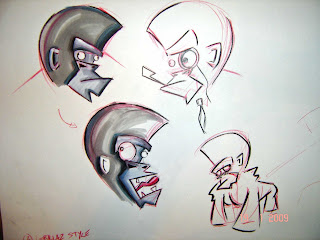
Hopefully now we have more of an idea what each style would involve and which suits the character and claymation effect best. I shall consult the guys tomorrow...
I started by researching gorillas on the net, looking at images of them - cartoony adaptions by other people aswell as real life photo's. I could post them up here on the blog but it's pointless as they're everything from page 1 - 50 on the google image search of gorilla, funny gorilla, cartoon gorilla, etc etc. There's too many reference images I've used to show you where my inspirations have come from. I may post a few of my favs at a later date to show you the few that grabbed my attaention and I decided to adapt and develop. Below are my very very rough concepts which I struggled to find any I liked:


I showed the guys these loose thumb nails and we agreed on the 3 designs we liked most. I then went on to develop the 3 in a way which would give us more idea of how they may look with say a body or tidied up a bit. We chose one of the green sketches with the bannana shaped head design, one of the blue sketches which was a sort of potato head/totem pole wild design, and lastly another of the blue sketches which reminded me and Tom of the Gorillaz sort of style, very jagged and angular. I then produced a few more sketches of the 3 favoured designs:
1. Bannana Head Shape Design


2. Totem Pole / Potato Design


3. Gorillaz Design

Hopefully now we have more of an idea what each style would involve and which suits the character and claymation effect best. I shall consult the guys tomorrow...
Delegating Tasks...
A Quick Low Down
I thought I better post up our actual idea for this project as none of us seem to have stated what we intend to do. We are doing an adaptation of brief C - the character animation project. There are 3 of us in the group so we have picked 3 of the characters listed, one to design, model, rig, texture and snimate each! We scrapped the 2 children and grandma as we found them the least interesting of the list. Instead we picked Cornelius the well educated respected Gorilla, and Wee Eck McGlone - the long serving, bald, scot zoo keeper. We were stuck for a 3rd and decided to adapt the brief as Jared said we were aloud to and add our own 3rd character. We chose to insert another Gorilla into the mix, however this one would be a dumb normal non speaking Gorilla that Cornelius would be stuck in a cage with. The 2 could bounce off each other perfectly and allow them to interact in a humourous way. As for the story, we're still working on that - we know we want to do 3 short funny advertisments rather than just the 1 suggested in the brief. Oh and we have the best ever super duper never thought of before setting to our film - Top secret atm tho.
Jobs for the Boys
Today we split up the concept work needed to be done into 3 equal shares. We decided I would be in charge of designing Cornelius the Gorilla and his dumb double act. Tom is designing Wee Eck McGlone and Alec is focusing on storyboard, animation tests, and set. We decided I should design both Gorillas because they must both be designed in the same style. A curvy rounded gorilla next to a jagged angular designed gorilla would simply look wrong. The must be the same - but different? - if that makes sense. When all character development is done and concepts finished we will then all start modelling our own characters, mine being Cornelius. Now the tasks are divided we can get on with it and re group this wek with our designs and discuss favourites to develop further.
Thursday 15 January 2009
Play-Do
Today myself, Alec and Tom experimented with the wonderful invention that is play DO. We figured that if we are to make this film in a clay mation style then what better way to study the material than to play with it. We first took note of its texture and appearance, the way light reacted to it, its flexibility, feel, etc etc. We found out that by modelling with it, your hands leave finger and palm prints all over its surface. It is quite a dull/non reflective material, aswell as being very soft and easy to mould. It is hard to achieve a sompletely spherical smooth shape as the Playdo naturally is bumpy and has an un even look about it. Aswell as prints we also found that smaller objects and fine details could be seen on the outer exterior of the Do, such as hairs, scratches and dust. We took note of all the properties we observed in order for us to achieve the same texture in maya. The more you know about a texture the easier it is to replicate.
Next up we played around with character design. I have never used any other medium than 2D for concept designs in the past however I can safely say Play Do is an excellent way of experimenting with primilnary designs! Again part of the reason for using the play do was because we need our characters to look like they have been modelled out of it anyway but it soon became clear that it is also incredibly easy to knock out quick ideas. You are able to change, re mould, add to, remove, squish, expand or demolish any idea you come up with quickly rather than by pencil having to rub out or re draw. We spent the good part of a day modelling gorillas and the scottish zoo keeper, only focusing on head design for the time being. The brief stated we must include very expressional animation so we wanted the face features to be adaptable to crazy feature expressions. We came up with about 11 or so Gorilla concepts and 5 or 6 scotsman heads. All in all it was a fun session and we have already got an idea for the kind of style we want to go for, and few favourite heads! Group moral is up, we must keep working at this rate!
"Every day is Precious" Alec Smith 2009
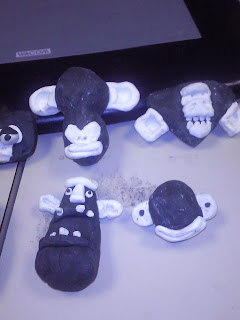
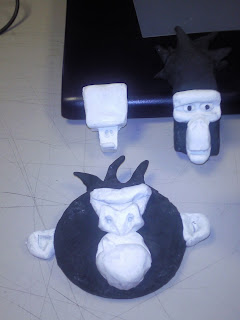
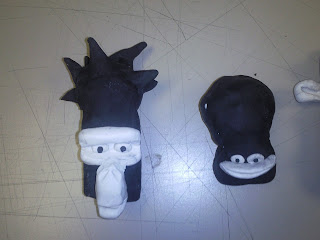
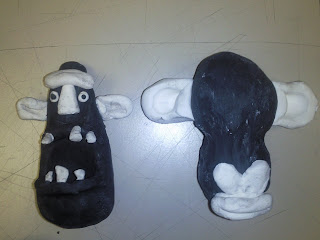
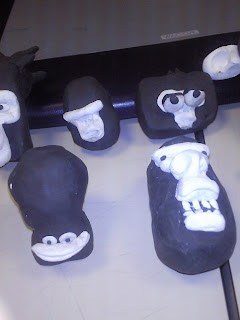
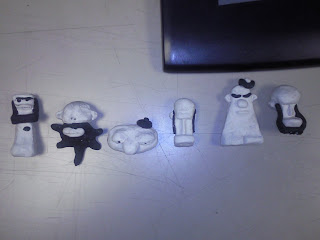
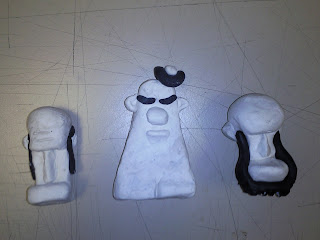


Subscribe to:
Posts (Atom)
