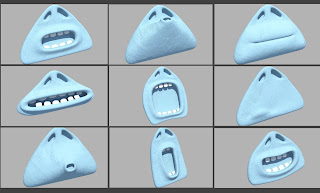
That sentence summed up today pretty well as we had quite productive progress. I hit a major problem last night in that when I tested how the texture on the mouth looked after being blenshaped it was badly strecthed and deformed. I consulted Alec this morning and he played around with trying to environment map it and blend textures - all sorts of shizzle - but alas we got no where. Luckily Dan Dalli was in the room to seek advice from and he suggested a projection technique he had used in the past with lightwave. If we could project a texture onto our mouth rather than UV map/wrap it then the finger prints would stay stationary no matter how the mouth deformed or moved. I searched it on google and sure enough he was right there is a simple tick box selection within maya to apply a 2D projection rather than a normal. Sweeeeeet! It solves our problem because the we can now also animate the projection plane allowing the prints to randomly move around the mouth - achieving the stop motion look.
It does however make me wonder how you would go about solving the problem if you were texturing say a realistic mouth with stubble, hairs, wrinkles etc and you create blenshapes which stretch your texture placement? The projection would not work as it would result in stationary wrinkles aswell as no movement of skin? We are lucky that we want our prints to move - just not stretch. It seems like an issue with no answer? how can you blend geometry without expecting the texture applied to it to morph and stretch? Do you blend textures? I honestly don't know - Autodesk can't have not thought about this one, or as Dan Dalli said - there are probably people writing scripts and plug ins for this problem - earning bundles of cash!
Anyway here are the mouth blendshapes fully textured using bump 2D projection - we scrapped brownian layered texture as we have a new trick up our sleeve for achieving the ripples....

The simple tick box...

A quick playblast of the blenshapes in action with a wave deformer applied as well for rippling stop mo action.... Its V short tho...
Rigging began after the blenshape and texture problems were solved. I hate rigging, I don't find it visually appealing as say modelling or animating - its just, well, technical/maths/numbers! (sorry dave!) I have basic rigging knowledge from 1st year with Dan, and I attempted to rig one of my own characters over the summer holiday. I managed to get the rough skeleton of cornelius pinned out today. I created IK's for the legs which wasn't too difficult. I gave him 2 extra bones jolting out from the top of his back to allow movement for the shoulder blades. One bone has been placed almost in a neck like fashion to allow the head object (seperate object) to be parented to this part of the body. I will create a spline handle for the spine tommorow, as I think I can remember how. Hands and fingers will be done tommorow also with great difficulty! I quickly smooth bined this to my model and supriseingly it didn't look to bad - obviously weights need to be painted, but all in all it seemed animatable. I want to spend a good week on the rig, getting it fully functional with easy handles and controls attached, as well as painting weights. I will also touch up my model while I fiddle with the rig. Here is the rig so far, very simple...


No comments:
Post a Comment