Friday 27 February 2009

Blarghhhh

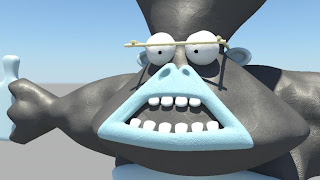
The Blarghhh scene. Facial expression based on Richie from Bottom:


Cornelius' version:

Thursday 26 February 2009

Even DreamWorks struggled to do what we're trying to do....

Yep, the issues me Alec and Tom are having are not easy to solve. Trying to achieve a stop motion look with Maya is a hard task and by the looks of things, even the best struggle. DreamWorks spents almost a year trying to recreate Aardmans Stop Mo look for Flushed Away using CG. This article I found explains the exact same difficulties they encountered that we are having. Read it guys.
http://www.studiodaily.com/main/technique/tprojects/Putting-a-Stop-Motion-Look-in-the-CG-Film-Flushed-Away_7478.html

We are a team of 3 2nd year animation students, all with basic knowledge of Maya, and a project duration of 8 weeks. We can hold our heads high if we complete this.
26th February 2009 - WORST DAY EVER


A button I want to invent:


Wednesday 25 February 2009

Ok so yesterday saw team pedro take a big step in the production process. Not only did we skip the huge task of painting waits but for the first time we gained an idea of how the CG would look composited with our background footage. To be honest we didnt know what to expect, whether it would look blatently CG and if it would fit in with the set. Well were all suprised at discover how good it came out., for a first test anyway.

The morning started with myself and Ally painting weights and touching up our rigs. We had the kind help of Mr Ross. After a while experimenting and skinning I concluded there was absolutely no point painting weights for my model as when skinned it worked almost perfectly with hardly and deformations - lucky i know! Dave assures me this is very unusual, especially for fingers to work fine without tugging on the skin of nearby fingers, but I wasn't complaining! I think alot of it comes down to the way I modelled Cornelius, as I concentrated on keeping neat edge flow and edge loops surrounding all my joints, no triangles etc. Plus the fact that he is made up of very basic primitive shapes. I was over the moon that I could just get on with animating. Alecs Gorilla was almost perfect after the skeleton was skinned, he just needed to paint weights on a few pinkys.

So first step was to import the particular background shot needed for Cornelius' first scene as a targa seq using premier. Then set it as image plane for a new camera. I then created a simple sphere to act as the pebble and allow shadows and occlusion to be created underneath Cornelius. I set its material to "use background cololur" meaning it wouldn't be rendered. I then placed Cornelius in his establishing sitting pose. I wanted him to be hunched over and sat like a real gorilla but the rig didn't allow it which sucked. So I had to settle for sitting him like a human on the edge of the pebble, which I guess you could say is more intelligent anyway?!

Alec then helped me re create the lighting within our live action footage. twas hard. We ended up having to simple ambient lights casting no shadows. One slightly pale grey/pink for the sky sort of colour, and one slightly brown for the subtle glow of the leaves kicking up from beneath him.

I then kncoked up a quick model of the Zoo magazine Cornelius is holding. Needs more work though - I would like it to be slightly reflective and more shiny.

Lastly I attempted a qucik piece of animation and lip sync for a composting test. I just made him take a sigh and look from page to page while humming. Looks OK - will come back to it later, it was only for test purposes. I struggled to animate in a stop motion way as it involves animating frame by frame badly - whereas I like smooth CG lol. As Alec said its like learning new animation principles all over again if we want to achieve a convincing stop mo look.

Yeah then rendered a batch, imoprted both occulsion and master layer into after FX.....

Tuesday 24 February 2009

ChEcK OuT CoRNeLiUS!!


Friday 20 February 2009

Boring post...

Really sorry to post another entry with no pictures or evidence of progress but lately the team have been solving issues and editing our live action footage. I'm going to break it down into what has been accomplished over the last week, as it seems like nothing to the untrained eye reading my blog this week...

Monday - All brought in our set objects. Meeting in preparation for zoo trip. Problems and solutions discussed and documented. Shots and angles planned out. Camera pan tests. Phone call to London Zoo. Gareths project.

Tuesday - London Zoo trip

Wednesday - Transferring footage from camera and videocam to PC. Organising footage and photos into folders. Backing up project. Picking favourites. We tried to figure out a way to achieve a stop motion look with the photos or footage we had. Alec cracked a method of acheiving stop motion look with photos:

1. Import first image of sequence into photoshop - set as background layer.
2. Import the following photos in the sequence as layers.
3. Individually adjust each layers oppacity 1 at a time in order to align with background layer. (remember to slap the oppacity back up once done)
4. Re-size canvas to compensate for loss of frame.
5. Make sure all layers are visable and save as PSD.
6. New project in premier - settings - 24FPS.
7.Import PSD as a sequence in premier - NOT footage.
8. Slap layers into timeline.
9. Resize each frame to the same size.
10. Change duration of each frame to 1sec, and resquish them back together.
NOTE: If you want 1 second of footage then this requires 12 frames. 2secs - 24frames.
10. Export as movie - uncompressed - millions of colours +
11. Re-import movie and change duration of movie to 1 second (assuming your dealing with a 12 frame segment) The project is set to 24fps so it will double your 12 frames and hold on each one for twice as long.
12. Simply copy and paste to loop shot.
13. Export as movie shot.

A long long process but the it provides awesome high quality stop motion results. It also stops the twigs at the front of the cage moving around too much as it would be way too difficult to composite. We did this pretty much all day.

Thursday -

Massive meeting about our storyline. 3 shorts idea scrapped, instead make 1 slightly longer short. Storyboarded & decided on dialogue. More of the "GAY" photoshop, premier routine. We then had the fun task of recording dialogue! We casted Dave Ross as Cornelius, Alec as William, and Tom as McGlone. Finalised disc. Went to transfer audio from CD to PC when hit with an error - CDA. files not compatiable! We had to spend a good hour or so converting them all to MP3's on a shitty MAC. Me and Alec then stayed late matching up the audio with our finished shots in one big premier file. This would give us an idea for timing and allow us to know which shot to import into maya for each lip sync and character animation piece. We had a really good animatic/final live action edit at 6.30pm.

Friday -

10.30am - file corrupt. **** sake. I was too angry to continue work on Team Pedro and worked on Gareths project. Me and Alec stayed late once again and got the live action edit finished with audio for a SECOND time! Was worth it though, it's better now if anything, and ready to be animated on top of. Hurrah!

So yeah that was the boring but much needed week. Next week should be much more fun - painting weights, importing sequences in, lip syncing, and animating!

Stay tuned.

Tuesday 17 February 2009

London Zoo Trip

The trip was a success! well sort of. It was a really really really funny day! The plus point is we managed to smuggle the twig cage and pebble in with no arrests. The negatives were - it cost £15 each, it was a muggy day, it was really busy because of half term, and to top it off the gorillas decided to stay in the indoor section of the cage for the best part of the day - typical.

We headed straight for Gorilla Kingdom upon entry after a panic stricken ordeal at the entrance - Alec was really worried we'd get searched for some reason. Anyway it was clear that there were no gorillas in the open enclosure so we wandered inside. We were a bit peeved at first because the gorillas were all sitting down behind big glass windows with loads of people crowding around the barriers making it almost impossible to achieve the nice pan down shot we so badly wanted. Plus there was no shrubbery or bushes indoors apart from a little penned off area containing a few palms surrounded by high netting. There were a few guards around, one elderly lady who insisted on no flash phtography and some guy wearing a britney spears type micraphone. He immediately started blaring out information right next to us so that location was out of the question - security was tight lol.

We compensated and managed to place the cage in a bush right next to the gorilla kingdom sign. We filmed a few nice pan shots down here. We were fairly happy with this however it was not ideal - more of a backup. We also placed it near monkey cages and attempted pans there, however the cage looked blatently empty so that was gay lol.

We then went off to a discreet area of the zoo where there were a few bushes that resembled the ones near the sign we had filmed - perfect for our still shots. We filmed and took pictures of all the camera angles needed. By this point about 10 people had asked why we were carrying a twig cage around the zoo, and what it was for. 2 of the zoo keepers stopped us but when we said it was an art project they retreated looking rather grumpy. 3 guys crowded round an empty 30cm high twig cage in a bush taking pictures and making funny noises must have been a hilarious sight!

So yeah we were about to call it a day when we decided to go back to the inside gorilla cage and try and chuck the cage over the shrubbery fence to get our gorilla pan shot! It honestly was like a military operation - Alec threw the cage over the penned off palms when none of the keepers were looking, then positioned it throught the bars! It was so funny, the shear effort we went to to get a twig cage in a bush unoticed and film it. We got a couple of ok pans in the end and headed back to the exit.

BUT! When we walked past the open enclosure gorilla cage on the way back they were out! So we quickly postioned the cage in a nearby bush, and began pan shots from the roaming gorillas down to the bush. The battery was just about to die when I pulled off the perfect steady pan! It literally was the last shot of the day, I panned down to the bush, stopped for a second and the battery died! Too lucky. Anyway we were really pleased with that last shot and headed home.

All in all a great day out and all live action footage and pictures are ready to be imported into Maya tommorow. Plus we managed to film a few sneaky extras.... ;)

Monday 16 February 2009

London Zoo: "Nah you can't bring that twig in here mate"

Team Pedro met today to display our amazing naturalistic set objects to one another. Tom had made a lovely Gorilla cage sign with a piece of cleverly crafted bark and red paint. I showed pictures of my elegent precision engineered twig cage. Oh and Alec found a rock on the way to college.
Yeah so everything was going swimmingly with the set, unfortunately my chat with London Zoo help line didn't go quite so well.
I rang up and firstly asked about any student discounts? - No.
Can we film using a small digital camera (the type all familys bring to the zoo)? - Fill out a form online.
I then enquired about bringing a tri pod to the Zoo tommorow explaining it was for a college project - I got another point blank No. Apparently you can only bring a tripod if you are a member of the press.
So on to the more important question for this charming woman on the phone - surely this would be a yes, there is no possible reason for it to be another no....
"can we bring a few sticks and a pebble into the zoo?" .... all hell broke loose.
Defensive isn't the word, the woman couldn't comprehend that I didn't want to harm the animals with the pebble and that the twigs would not be used to stress out or irratate the gorillas!
No I replie, simply to be placed on the grass in a quiet area of the zoo for a college project.
"I just don't understand why you would want to bring sticks and a rock into our zoo sir, it sounds very suspicious and could be something used to distress the animals and provoke attention from the zoo keepers"
The conversation continued and I ended up having to basically explain CG compositing to the lady who still humed and harred about why I would want to bring in such dangerous items lol. Anyway it ended up being a no.
So we're going up tommorow anyway - I'll let you know how it goes!

Building a Cage . . .

Practical work! At last some work I could get messy with and use my hands rather than a mouse! I was given the task this weekend of constructing the live action twig cage our animation would take part in. Alec was to aquire the rock, Tom the small sign and camera. All of us agreed to bring in our objects for Monday ready for a test run of tommorows trip to London Zoo.
So I ventured up my local woods on Sunday collecting as many straight sticks and twigs as I could to build the cage with. It was slightly more difficult than expected because the recent weather had made most sticks completely dry, hollow, flimsy etc. I collected about 20 perfect sticks (size and width) and set about gluing them together.
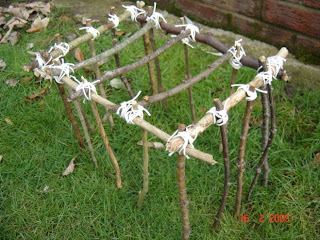
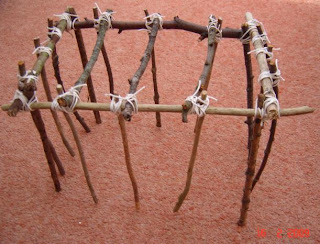
The cage was to be built A4 paper size to allow for handling and the rock etc. I constructed the cage using string to tie the sticks together along with glue for extra stabilty. I was suprised at how fiddly and delicate working with sticks and string is, especially trying to get the whole thing to stay still and not collapse every 2 seconds! I eventually managed to stabilse the cage by adding a cardboard base which I later removed. It ended up taking me the whole day to finish . . . but it was worth it ;) .....


Thursday 12 February 2009

Rigging ...


Rig test ONE

Wednesday 11 February 2009

Rigging Started & Blendshapes Complete!

"All in all good sh** is going down." Alec Smith 2009

That sentence summed up today pretty well as we had quite productive progress. I hit a major problem last night in that when I tested how the texture on the mouth looked after being blenshaped it was badly strecthed and deformed. I consulted Alec this morning and he played around with trying to environment map it and blend textures - all sorts of shizzle - but alas we got no where. Luckily Dan Dalli was in the room to seek advice from and he suggested a projection technique he had used in the past with lightwave. If we could project a texture onto our mouth rather than UV map/wrap it then the finger prints would stay stationary no matter how the mouth deformed or moved. I searched it on google and sure enough he was right there is a simple tick box selection within maya to apply a 2D projection rather than a normal. Sweeeeeet! It solves our problem because the we can now also animate the projection plane allowing the prints to randomly move around the mouth - achieving the stop motion look.
It does however make me wonder how you would go about solving the problem if you were texturing say a realistic mouth with stubble, hairs, wrinkles etc and you create blenshapes which stretch your texture placement? The projection would not work as it would result in stationary wrinkles aswell as no movement of skin? We are lucky that we want our prints to move - just not stretch. It seems like an issue with no answer? how can you blend geometry without expecting the texture applied to it to morph and stretch? Do you blend textures? I honestly don't know - Autodesk can't have not thought about this one, or as Dan Dalli said - there are probably people writing scripts and plug ins for this problem - earning bundles of cash!

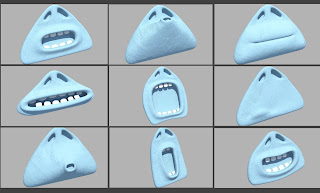
Anyway here are the mouth blendshapes fully textured using bump 2D projection - we scrapped brownian layered texture as we have a new trick up our sleeve for achieving the ripples....


The simple tick box...


A quick playblast of the blenshapes in action with a wave deformer applied as well for rippling stop mo action.... Its V short tho...


Rigging began after the blenshape and texture problems were solved. I hate rigging, I don't find it visually appealing as say modelling or animating - its just, well, technical/maths/numbers! (sorry dave!) I have basic rigging knowledge from 1st year with Dan, and I attempted to rig one of my own characters over the summer holiday. I managed to get the rough skeleton of cornelius pinned out today. I created IK's for the legs which wasn't too difficult. I gave him 2 extra bones jolting out from the top of his back to allow movement for the shoulder blades. One bone has been placed almost in a neck like fashion to allow the head object (seperate object) to be parented to this part of the body. I will create a spline handle for the spine tommorow, as I think I can remember how. Hands and fingers will be done tommorow also with great difficulty! I quickly smooth bined this to my model and supriseingly it didn't look to bad - obviously weights need to be painted, but all in all it seemed animatable. I want to spend a good week on the rig, getting it fully functional with easy handles and controls attached, as well as painting weights. I will also touch up my model while I fiddle with the rig. Here is the rig so far, very simple...


Tuesday 10 February 2009

Formative

Today we had formative with Jared in which we graded ourselves and evaluated our progress so far on the project. It was a good chance to find out what was lacking from our blogs so we can rectify it for when summative comes around. I did fairly well all in all, achieving goods in most areas except research - as I have rarely compared it to existing work of others. It's wierd because on the last project I did alot of that - posting up good reference images and films we should aspire to etc. However with this unit I have kind of forgotten all about that and just got on with documenting our production. As of today I will take more time to study other work and post any relevent information, designs, or films I come across that could help us or maybe even influence us. In fact here's a few inspirations I should have posted up weeks ago.......

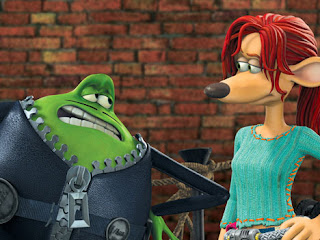
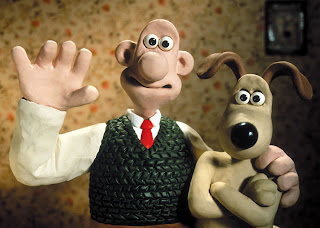
Flushed Away

Aardman & Dreamworks collaborated to make this CG feature length film about a rats adventure down in the sewers. They attempted to re create the Wallace and Gromit style of animtion but using 3D software rather than plastercine. In my opinion they were successful in copying Aardmans character design styles i.e wide looped mouths, shiny black noses, square teeth etc. However the animation did not look stop motion enough. There was not enough jerks and fast movements to convince the audience it had been hand made and animated frame by frame. Because of this smooth animation it became simply another CG movie which had characters that happened to look similar to that of W&G. Another major flaw in their attempts to re create Aardmans stop mo style was their lack of texture! I don't think I saw one fingerprint, misplaced blob, or even a wrinkle smudge on the characters throughout the film. Everything was highly polished, vibrant in colour, and seemed to be imaculately smooth. It was as if no hand had ever touched the clay models! Oh but wait, their CG aren't they, of course. They should have put more effort into recreating what Aardman achieve by using their bare hand, slight subtle obscurities in the plastercine, pencil jabs, smudges, blotches of colour. Nothings perfect with stop mo. Unfortunately this let them down.


Notice the difference in clarity? For once we don't want the polished, sharp, completely smooth look. We want the finger pushed, wobbly edged, smudged look which makes claymation so unique. We hope to better Dreamworks in recreating this style!

Deadline
A short CG film produced by Aardman a while back using Maya. I love the humour in it, and the character designs. This is another example of an attempt to recreate of stop mo animation. In my opinion this one was slightly more successful in achieving that than flushed away. It had more jerky movements and flappy poses. The textures are slightly more drab and unsmooth aswell. It went on to become a series called "The Presentators" on Nickelodeon. Getting there....

According to the Aardman CG department who worked on the shorts, they were not simply mimicking the look of the company's traditional clay-model animation with "The Presentators." Rather, trying to apply digital techniques to enhance the appeal, timing, and strong design for which Aardman's claymation films are known.
An excuse maybe?!

http://www.youtube.com/watch?v=fbm5HJ9cohY

Here is a short interesting article about the series..

http://www.cgw.com/ME2/dirmod.asp?sid=&nm=&type=Publishing&mod=Publications%3A%3AArticle&mid=8F3A7027421841978F18BE895F87F791&tier=4&id=CAAC173059C44AAA84B96E0FD53EA3E8C44AAA84B96E0FD53EA3E8


Creature Comforts

Of course other typical inspirations from the likes of Aardman would be Creature Comforts, which actually is very relevent to our film as it deals with animals. I was interested in how they portrayed a gorilla in claymation, was there an episode involving a Gorilla? Yep....
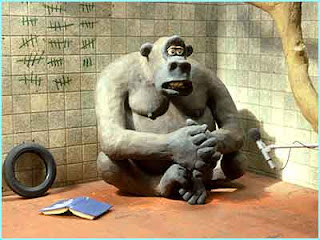


Very well made and simplistic. In fact the series was made using claymation techniques so they got the look spot on lol. Maybe we should just make ours with clay? Instead of using a computer!!!!

Monday 9 February 2009

Delays

Well it's Monday evening and little has been done for our project over the last week due to untold amount of lectures and other units getting in the way! I spent all of today editing my footage for Gareths unit - 203, which I feel is coming along really nicely now, especially now I have audio to match my cuts and pace to.
Tommorow is formative with Jared so hopefully we can have a good chat about what needs to be done and how well we're doing time wise. I'm unsure on whether we're behind schedule as we have almost completed modelling (90%) and texturing (80%), so that leaves rigging and animation left, as well as building our set, compositing and dialogue. We are at the mid point of the unit so I feel we aren't doing bad, but could be doing better if we had more time to spend on it - hoepfully Jared will see it that way.
Anyway as of tommorow it's unit 204 for the rest of the week! Team Pedro are still going strong!

Friday 6 February 2009

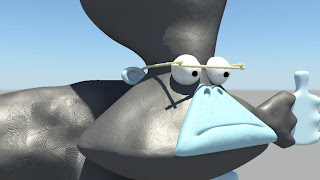
Glasses...

Wednesday 4 February 2009

Mouth tests

Ok so yesterday myself and Alec spent the day experimenting with mouths for our gorillas as it was kind of a modelling priority. We discussed thoughts and I showed him my expression sheet to give him an idea of the sort of mouth I was invisinging. We agreed it needed to be an actual hollow mouth rather than a simple tube like ring that everyone does when they can't be arsed to do a proper mouth (guilty as charged with Lil G!). In that case to be a proper mouth and still look like playdo we would have to go down the wallace and gromit style route. I explained to the guys that if this piece is to be show reel worthy we should include teeth and make it one hollow, fully blend shapeable, playdo mouth - industry standard - u get me.

So we set off on an adventure to see who could make the best mouth first - sticking to our designs of course. Alecs Gorilla - William has a long droopy shaped mouth, where as mine - Cornelius a stretched triangular shape. We both succeeded by mid-day in creating an open hollow simple mouth with nostrils - all one piece of geometry. I tweaked mine and placed it on the gorilla to get an idea for size and made a quick set of nashers to get a feel for the how the mouth could look mid sentence. I spent a bit of time texturing it aswell to get an idea for how clay-like it looked. Both our mouths looked great by the end of the day and Alec even began making a few simple blendshapes for his which worked perfectly - ooo's, ahhhh's, eeeee's etc.

We were both suprised how easy it was to model a mouth when you dont complicate things and think about poly count, rings around mouth, edge flow, complex throats etc! KEEP IT SIMPLE!Just start with the basic shape, extrude inwards and work from there, adding detail as you go, keep edge loops to a minimum and remember - smoothing helps alot.

Anyway so yeah I grabbed a few screenshots of how it was looking wednesday evening....


(It is a hollow mouth not a ring mouth! It just looks like a ring mouth because I pushed it into the head so you can't see the back of the mouth/throat which is also blue. I need to pull it out a bit)

However.... It was not until today that I hit a few snags with my mouth. Alecs was working great, the blendshapes looked so simple yet effective, but mine was really really hard to blend into a new expression because of the amount of vertex's I had modelled it with, and the complexity of the shape. Closing it was just about managable but not without pinching and a huge lip. As far as OOooo's and eeee's, it just couldn't hack it. So I compared mine to Alecs and realised I would have to restart the mouth. The difference was Alec had modelled with far less polygons and used a simple rectangle which when smoothed produced the rounded edges needed. His mouth could be literally squashed into all the shapes needed without deforming and had no extra edge loops added for roundness. I copied his style of modelling and applied it to my triangle shape and after half an hour or so had a much more efficient and functionable mouth. We both agree it doesn't look quite as good as my previous mouth (above) but it will be far easier to animate and blend. I am going to produce my blendshapes tommorow and post up the vids of them in action, I will also post up the screenshots of the new mouth aswell as some funky bamboo glasses I modelled during lunch yesterdaY!.......

Tuesday 3 February 2009

Quick Facial...

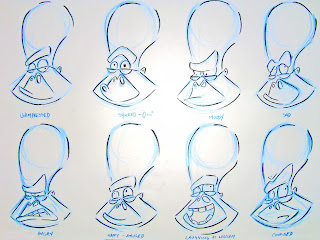
Right well considering we've been off the last 2 days and I dont have maya at home I had to resort to doing more concept work to keep the juices flowing. I say resort, i actually really like the design aspect of a project, particuarly facial expression boards. I decided to do one for Cornelius because myself and Alec are still quite unsure of how we are going to achieve our gorilla mouths to represent something similar to that of wallace and gromit when they are open. An expression board is a good way of seeing how the mouth will deform from the simplest of movemnts to the more extreme. It gives a good idea of the blend shapes needed and how to actually construct the hollow mouth. Cornelius rarely opens his mouth wide unlike William but does still need the ooo, ahhh, eee sounds needed for lip syncing and quality of animation. A still mouth or a simple tube like style (which I used for Lil G in Cribbin) is far to simple and obvious for year 2. I believe we can achieve the wallace and gromit style mouths however it will take time and patience - but it will make it show reel worthy. Alec mentioned maybe modelling like 4 or 5 seperate mouths and changing them between frames however I think this may look to drastic of a change - I think blend shapes is the way forawrd. Anywho me and Ally Babes will discuss mouths tommorow and reach a soloution. Hopefully this quick facial expression board I produced today will help.....

Monday 2 February 2009

Snow use going in!

College closed today and tommorow because of heavy snow! Not good as far as project progress goes as I don't have maya at home to continue work, but it does mean I can build a snowman :D I will continue concept work - facial expression sheets for Cornelius etc. I hope the snow doesn't knock much more than 2morow off our tight schedule though. . . .